Saturday, February 20, 2010
Friday, February 19, 2010
ROAD TEST! The first LONG drive of 16336
*Special thanks to Ozzie and Brian for a great morning!*
Sunday, November 29, 2009
I have never really put the car on a long drive. The furthest it has gone has been to Hollywood to my mom's condo via surface streets. I have never fully highway'd the car for a long period of time or for a long distance.
Ozzie had called me to see if i was interested in pushing my luck...haha. Since he had done some work on his car, and his son was down from college, why not see what would happen? At least with another driver with me, if anything had happened, I would not be too worried.
Brian came in driving his Mk II Supra, and Ozzie came with his car:

Brian's AMAZINGLY clean Mk II. This will serve as the camera car that Ozzie will be driving as he shoots the pictures.

The first picture of our cars together, as mine has never really been "done" enough to drive like I wanted. Ozzie's car is on the left, i'm on the right. Notice how LOW my car is compared to the stock height of Ozzie's car.

All three Sunday morning cruisers.

This is the first time i've ever seen the outside of my car while on the road! I'm the low car on the right. This could turn out to be the world's SLOWEST drag race....

It DRIVES!!! I-75 west bound on the way to US-27. Notice my custom door ding. It makes the car faster....

Ozzie's VERY clean car, with his lead footed son driving :D

This is only the 2nd time I have ever put gas in the car!

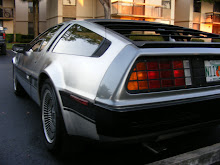
I-595 West Bound right before the 75 exchange. You can really see how low my car is. PERFECT.

Probably my favorite picture. Ozzie is a GREAT photographer! All this while driving!

Time to turn around and head south.
The results: My car and Ozzie's car were 100% perfect on this trip. Not one hiccup, not one issue. All in all, we drove for about 45 minutes straight, really stretching the legs of the cars. Brian's Supra was surprisingly quick, because I can see who he inherited his lead foot from! haha!
This was a GREAT morning for a drive! Very fun, great weather, and good friends. What can be better?
Sunday, November 29, 2009
I have never really put the car on a long drive. The furthest it has gone has been to Hollywood to my mom's condo via surface streets. I have never fully highway'd the car for a long period of time or for a long distance.
Ozzie had called me to see if i was interested in pushing my luck...haha. Since he had done some work on his car, and his son was down from college, why not see what would happen? At least with another driver with me, if anything had happened, I would not be too worried.
Brian came in driving his Mk II Supra, and Ozzie came with his car:

Brian's AMAZINGLY clean Mk II. This will serve as the camera car that Ozzie will be driving as he shoots the pictures.

The first picture of our cars together, as mine has never really been "done" enough to drive like I wanted. Ozzie's car is on the left, i'm on the right. Notice how LOW my car is compared to the stock height of Ozzie's car.

All three Sunday morning cruisers.

This is the first time i've ever seen the outside of my car while on the road! I'm the low car on the right. This could turn out to be the world's SLOWEST drag race....

It DRIVES!!! I-75 west bound on the way to US-27. Notice my custom door ding. It makes the car faster....

Ozzie's VERY clean car, with his lead footed son driving :D

This is only the 2nd time I have ever put gas in the car!

I-595 West Bound right before the 75 exchange. You can really see how low my car is. PERFECT.

Probably my favorite picture. Ozzie is a GREAT photographer! All this while driving!

Time to turn around and head south.
The results: My car and Ozzie's car were 100% perfect on this trip. Not one hiccup, not one issue. All in all, we drove for about 45 minutes straight, really stretching the legs of the cars. Brian's Supra was surprisingly quick, because I can see who he inherited his lead foot from! haha!
This was a GREAT morning for a drive! Very fun, great weather, and good friends. What can be better?
DETAIL: A full exterior detail of the car for the first time
After the headlight install, I decided since the car was 100% road worthy and safe, it was time to blend the panels and give it a proper bath.
No real secrets, just wash and detail, plus some nice shots. Enjoy!


Notice the sign behind the car: 'Future' Resident Parking... get it?!? Sigh...
Now for a comparison: This is the day I brought the car home... May, 2009...

No real secrets, just wash and detail, plus some nice shots. Enjoy!


Notice the sign behind the car: 'Future' Resident Parking... get it?!? Sigh...
Now for a comparison: This is the day I brought the car home... May, 2009...

INSTALLATION: Silverstar Headlights
Special thanks to Joe and Melissa for loaning me their garage once again! Without them, I'd be lost.
I spent time running around to different auto parts stores back in September, 2009 to find Silverstar headlights. The advantages are a cleaner beam of light, versus the yellowed water-filled lights that were currently on the car.
I purchased the low beams from Autozone off of 441 and Broward Blvd, and the High Beams from Pep Boys on Sunrise Blvd.

Here is Joe starting to remove the stripped screws from the passenger side. His screw driver was perfect for biting into the stripped heads.


My headlight buckets were no where as bad as I thought they would be. I will actually re-furbish the entire assembly later on in the future. Right now, they will hold up just fine.

One lesson we both learned: Both of our hands are too big for the tiny stainless steel screws used to hold the lens rings in place. There are now little screws rattling around in my fascia somewhere... oh well! That's restoration for ya!
Budget building 101... trade, barter, sell... keep your overhead LOW!
Im a firm believer that you can get deals if you are patient and wait around. That's exactly what I did.
I was contacted by a guy off of facebook asking if I was interested in buying some DeLo parts for cheap. Sure! Why the hell not? I asked him what he had, and literally he had MOST of what I needed.
When asking what he wanted for the parts, he told me he was in dire need of a decent laptop. PERFECT! I have a laptop that was only a few months old that I really wasn't using as much as I thought I would be, so what better way to get parts?!? I selected the following parts:
- 140 mph speedo
- battery tie down strap
- aftermarket steering wheel collar
- all new side marker lenses
- hood emblem
- grille emblem
- black DMCH seat covers (new)
- NEW black DMC dash
- NEW ORIGINAL binnacle- black
- L and R door escucheons
- Ashtray
- DMC shirts
- NEW mirror switch
- Driver's side metal door handle
- DMC Banner/flag
- issues of DeLoreans magazine
- Aftermarket steering wheel
- Engine cover hinges
- Interior lights
- Glove box lid
- Rearview mirror
...and some other miscellaneous items.
I drove up to Orlando to scout schools, and while on the trip, headed to pick up the parts. The transaction was very smooth, and he took me to his warehouse to get the stuff. He said he got most of this stuff from an owner when he sold his car. The parts came with the car he was picking up. Pretty awesome score for me!
This really kept purchasing costs down.
I purchased the following:
1. dwell meter from Sears for $20.93
2. Long allen wrench set from Sears $12.99
total for that trip to sears: $33.92
Harbor freight has become my new Sunday morning cruise spot. Even if i dont buy anything, I like to just go walk around. Ozzie has been joining me lately, so company is always good!
Only 3 months since my last update?!?
Hello all. Yes, it has been an entire three months since my last update. i will try to do better, but I am also a full time student as well as holding down a full-time job, so taking the time to write out everything kinda takes a back seat.
So, with that being said, I will update the blog this weekend with all new pics, stories, and budget updates.
So, with that being said, I will update the blog this weekend with all new pics, stories, and budget updates.
Sunday, November 8, 2009
Chaaaarge! Please? Pretty Please? Bad Alternator Replacement!
I will be the first to say that I love the vendors. Sure, they offer some amazing products and such, but sometimes I like thinking outside the box.
Lets take a look at alternators.
DMCH and SpecialTAuto (or deloreanautoparts.com) both have alternators. Both will set you back a few bucks, but both have controversy following them, depending on if you want a super-overpowered model that has a record of failing, or if you want a direct bolt in replacement.
After doing some homework, I found that it is VERY possible to take an off the shelf alternator and install it into my car.

I spoke to a forum member, and ended up securing an alternator for a 1994 Chevy Lumina for $100.00 with a lifetime replacement warranty. That is great, because once installed, I can simply unplug it and swap it for a new one without any shipping or waiting! Since i'm planning on driving this car, it also makes it possible to replace it on the road, as long as there is an auto parts store. Note the serpentine pulley. You WILL need to swap your stock pulley.
First, I secured the alternator at Autozone (Part Number: DL1387-6-3.
The next item that had to be purchased was the pigtail connector to allow plug and play connecting.

I found this connector (part number 30707 if you order from Autozone.com)on ebay for $13.00 shipped! Sweet! I believe I found it using the same part number, because it is the number from Painless Wiring. It is a two wire hook-up, which you will need. I will explain it as I go on.

This is the stock Motorola alternator. The reason I replaced it was because i could hear the bearings squealing as it turned. A sure sign that failure was about to happen.
 I strongly suggest having a second person help you. You CAN do this with one person, but sometimes it saves time from going from under the car to above the car... and vice versa... This is my friend Vic learning the ropes of D maintenance.
Before we get going, lets get our tools ready:
1. Socket set with box-end wrenches
2. Needle nose pliars (always a good idea!)
3. RED locktite
4. (optional) air ratchet
5. Soldering iron with solder
6. Shrink wrap
7. Impact gun with impact sockets
8. Dremel with cut-off wheel (or a good hacksaw)
 I tried to undo the electrical connections from the stock alternator first, but that failed due to corosion, and the fact the post was free spinning with every turn of the ratchet. I instead dropped the alternator so I could attack it easier. Finally the corosion broke loose and I was able to remove all electrical connections.
 Here is a side by side comparison of the two alternators. The mount on the new one will have to be cut down slightly. I highly suggest a dremel with a cut off wheel, or a very good hacksaw.
 After you lay the two alternators side by side and measure how much of the new alternator you need to cut down, mark the area off with either a marker or some tape. I used blue painter's tape because it is VERY visible. Wearing proper eye protection (flying shards of aluminum are no fun...) Cut through the extra piece off the new alternator.

 Now, you can see the aftermath of the cut down: The removed portion that I cut off is in my hand.
 The little nub at the lower left corner is easily removed by the cut off wheel. Takes less than 10 seconds to grind down, but you can see the results of the cutting. VERY easy to do.
 Now, grab your impact gun and impact sockets and zap the V-pulley off of the original alternator, and zap the serpentine pulley (comes with a spacer and washer, btw...)off of each. To stop the pulley from free spinning, gently put a screw driver in between a fan blade and into the housing, then pull your trigger!
 VERY important: See that little spacer to the left of the pulley? Well, place that BEHIND your new fan. Reason? When you tighten the nut, you will put force on the fan, causing it to flex into the housing. With the spacer there, you can torque it down alot further. Install your old V pulley, washer, and nut. Before zipping it down, add the Lock-Tite! You'll thank me later...
 Here is a picture of the final product. Feel free to pull off the tape now... You will notice the NEW alternator does not have a rear bracket like the stock Motorola unit. If you notice your car's alternator mount, the part of the bracket your bolt goes though is significant, so don't worry.
Now, you have to solder in your connector. VERY easy to do. First, the white wire gets attached to the single brown wire that was attached to the back of your old alternator. This goes to your battery light. The second wire on your pigtail is red with a little loop on it. Simply attach this loop onto the post on the alternator that you are attaching your wiring bundle to. Shrink wrap, and plug into your alternator! When you route your wires, make sure you are away from the exhaust manifold!!!
 If you cut your alternator properly, it will line up PERFECTLY! Now, tension your belt so that you get 1" of flex with moderate pressure, and TEST!

 Yep, my voltage gauge is now showing an actual charge! BTW, my gauge is all screwed up. I will explain the issue with that in a future installment of the blog.
That's all there is to this upgrade. I can now replace my alternator ANYWHERE, including a junk yard, if i have to!
A very special thanks to:
- dmcman73 (steve) from DMCTalk.com for his great write up and instructions, plus for answering all my questions on the swap.
- Joe and Missy for loaning me their garage to do this on a very hot Saturday morning.
- Vic for being the second pair of hands.
Lets take a look at alternators.
DMCH and SpecialTAuto (or deloreanautoparts.com) both have alternators. Both will set you back a few bucks, but both have controversy following them, depending on if you want a super-overpowered model that has a record of failing, or if you want a direct bolt in replacement.
After doing some homework, I found that it is VERY possible to take an off the shelf alternator and install it into my car.

I spoke to a forum member, and ended up securing an alternator for a 1994 Chevy Lumina for $100.00 with a lifetime replacement warranty. That is great, because once installed, I can simply unplug it and swap it for a new one without any shipping or waiting! Since i'm planning on driving this car, it also makes it possible to replace it on the road, as long as there is an auto parts store. Note the serpentine pulley. You WILL need to swap your stock pulley.
First, I secured the alternator at Autozone (Part Number: DL1387-6-3.
The next item that had to be purchased was the pigtail connector to allow plug and play connecting.

I found this connector (part number 30707 if you order from Autozone.com)on ebay for $13.00 shipped! Sweet! I believe I found it using the same part number, because it is the number from Painless Wiring. It is a two wire hook-up, which you will need. I will explain it as I go on.

This is the stock Motorola alternator. The reason I replaced it was because i could hear the bearings squealing as it turned. A sure sign that failure was about to happen.
 I strongly suggest having a second person help you. You CAN do this with one person, but sometimes it saves time from going from under the car to above the car... and vice versa... This is my friend Vic learning the ropes of D maintenance.
Before we get going, lets get our tools ready:
1. Socket set with box-end wrenches
2. Needle nose pliars (always a good idea!)
3. RED locktite
4. (optional) air ratchet
5. Soldering iron with solder
6. Shrink wrap
7. Impact gun with impact sockets
8. Dremel with cut-off wheel (or a good hacksaw)
 I tried to undo the electrical connections from the stock alternator first, but that failed due to corosion, and the fact the post was free spinning with every turn of the ratchet. I instead dropped the alternator so I could attack it easier. Finally the corosion broke loose and I was able to remove all electrical connections.
 Here is a side by side comparison of the two alternators. The mount on the new one will have to be cut down slightly. I highly suggest a dremel with a cut off wheel, or a very good hacksaw.
 After you lay the two alternators side by side and measure how much of the new alternator you need to cut down, mark the area off with either a marker or some tape. I used blue painter's tape because it is VERY visible. Wearing proper eye protection (flying shards of aluminum are no fun...) Cut through the extra piece off the new alternator.
 Now, you can see the aftermath of the cut down: The removed portion that I cut off is in my hand.
 The little nub at the lower left corner is easily removed by the cut off wheel. Takes less than 10 seconds to grind down, but you can see the results of the cutting. VERY easy to do.
 Now, grab your impact gun and impact sockets and zap the V-pulley off of the original alternator, and zap the serpentine pulley (comes with a spacer and washer, btw...)off of each. To stop the pulley from free spinning, gently put a screw driver in between a fan blade and into the housing, then pull your trigger!
 VERY important: See that little spacer to the left of the pulley? Well, place that BEHIND your new fan. Reason? When you tighten the nut, you will put force on the fan, causing it to flex into the housing. With the spacer there, you can torque it down alot further. Install your old V pulley, washer, and nut. Before zipping it down, add the Lock-Tite! You'll thank me later...
 Here is a picture of the final product. Feel free to pull off the tape now... You will notice the NEW alternator does not have a rear bracket like the stock Motorola unit. If you notice your car's alternator mount, the part of the bracket your bolt goes though is significant, so don't worry.
Now, you have to solder in your connector. VERY easy to do. First, the white wire gets attached to the single brown wire that was attached to the back of your old alternator. This goes to your battery light. The second wire on your pigtail is red with a little loop on it. Simply attach this loop onto the post on the alternator that you are attaching your wiring bundle to. Shrink wrap, and plug into your alternator! When you route your wires, make sure you are away from the exhaust manifold!!!
 If you cut your alternator properly, it will line up PERFECTLY! Now, tension your belt so that you get 1" of flex with moderate pressure, and TEST!
 Yep, my voltage gauge is now showing an actual charge! BTW, my gauge is all screwed up. I will explain the issue with that in a future installment of the blog.
 That's all there is to this upgrade. I can now replace my alternator ANYWHERE, including a junk yard, if i have to!
A very special thanks to:
- dmcman73 (steve) from DMCTalk.com for his great write up and instructions, plus for answering all my questions on the swap.
- Joe and Missy for loaning me their garage to do this on a very hot Saturday morning.
- Vic for being the second pair of hands.
Subscribe to:
Posts (Atom)